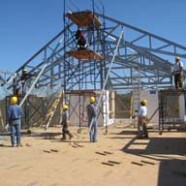
Erecting the roof
The trusses didn’t lift themselves, of course. Here you see the full crew (at the time) lifting a truss using a scaffold and hoist. “Monkey sticks” are used to stabilize the floppy truss, while the hoist holds the weight and manpower positions the ends for attachment. (Left to right: Tom, Francisco, Alex, Tim, David, Helmut, Julian.)
Meanwhile, note the wooden cleats on the floor. These comprise a template for building the trusses. Most trusses differ slightly, but have a common roof line and often a common ceiling line. An overlay of all truss designs is accurately drawn on the floor. Then the cleats are placed to hold the primary steel components in place while they’re screwed together. One at a time, the trusses are built on the floor, then tilted up, lifted, and placed as seen in the photograph. This concept of on-site floor-templates was also used by masons to build medieval cathedrals.
Note also the straight girder at the left, supported by two brown steel tubes (6″ x 12″ x 20 feet tall of which 9 feet is exposed above the floor). This girder, with three points supporting it (the third out of view to the left), holds up all the roof trusses at the back of the house. Otherwise, there’s no support at the back of the house. It’s all cantilevered back there. In the later photographs showing all the glass in back, this engineered structure is what makes it possible. Already, you can see in the background (between Francisco & Alex) where there’s a 45 degree corner with no visible means of support.

 Click image to enlarge


Recent Comments